Markup Tools & Collections
Annotate the map with pins, drawings, comments, notes, measurements, and project-linked boundaries.
Updated · June 2026
Markup Tools & Collections#
Pillar's markup tools let you annotate the map with pins, freehand drawings, comments, notes, measurements, and project-linked boundaries. Everything is shared with your team in real time and organized into collections or attached directly to a project.
The markup toolbar#
Click the pencil icon in the map toolbar to open the markup tools. The toolbar contains:
- A visibility toggle — show or hide all markup at once
- A collection picker — switch between collections (see below)
- Six tools — Pin, Comment, Note, Draw, Measure, and Select
Click a tool to activate it, click again to deactivate.
Pin#
Click the map to place a pin. A form appears where you can add:
- Label — a short title for the pin
- Description — additional details
- Color — choose from 8 presets (Indigo, Red, Amber, Emerald, Blue, Violet, Pink, Teal)
Click an existing pin to edit its label, description, color, or delete it.
Comment#
Click the map to start a comment thread. Type your message and press Enter. Comments support:
- Threaded replies — team members can reply to create a conversation
- Resolve/unresolve — mark a comment thread as resolved when the discussion is done
- @mentions — tag team members in your comments
Each comment shows the author's name, initials, and a relative timestamp.
Note#
Click and drag on the map to create a sticky note canvas. Notes use a rich text editor — type directly on the note surface on the map. Customize:
- Color — 6 pastel presets (yellow, red, green, blue, purple, orange)
- Opacity — slider from 30% to 100%
Notes can be repositioned by dragging and resized using the corner handles.
Draw#
Click and drag to draw freehand strokes on the map. Customize:
- Stroke color — 10 presets including black, red, blue, green, and white
- Stroke width — 5 size options from thin to thick
Click an existing drawing to change its color, width, or delete it.
Measure#
Click to place points that define a line or polygon. Double-click or press Enter to finish the shape.
While drawing, you'll see real-time measurements:
- Distance — total length of all segments
- Area — calculated when you have 3 or more points
- Per-segment labels — shown on the map (toggle with the labels button)
After finishing, choose a color and click Save Shape to persist the measurement. You can undo the last point while drawing, or discard the shape entirely.
Project-linked boundaries#
Project boundaries are markup shapes that belong to a project instead of a collection. Use them when the boundary is part of the deal itself: an assemblage outline, a proposed site area, a refined parcel edge, or any custom shape your team should keep with the project.
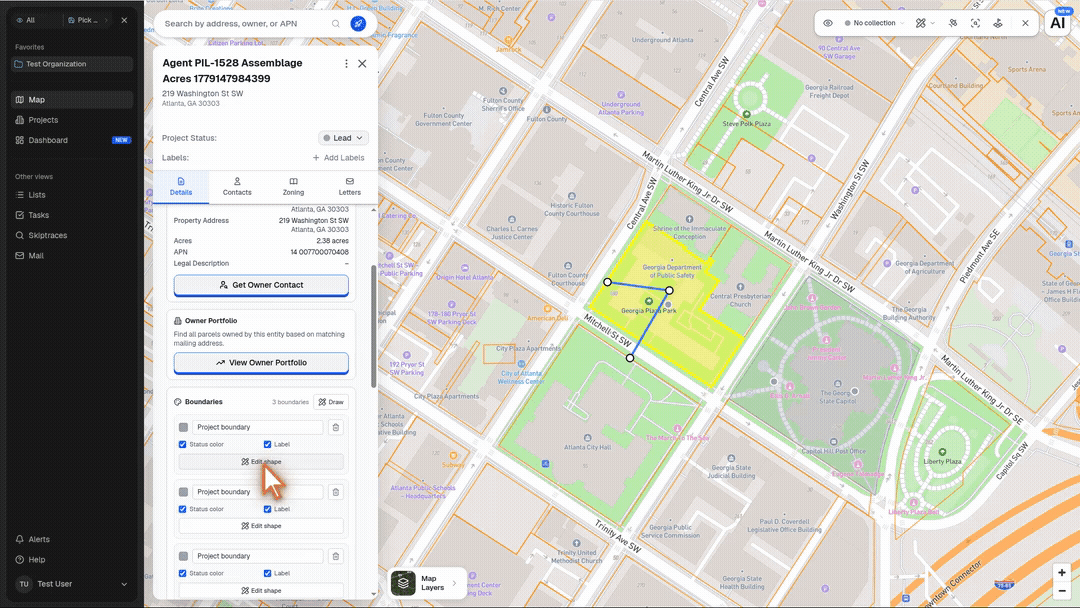
To add one:
- Open a saved project parcel on the map.
- On the Details tab, find the Boundaries section.
- Click Draw.
- Click the map to place boundary points.
- Click Finish in the measurement toolbar.
The shape is saved as a project boundary. It appears in the project's Boundaries section with controls for:
- Boundary label — rename the shape shown in the project panel and on the map
- Status color — keep the boundary color tied to the project's current status color
- Label — show or hide the boundary label on the map
- Edit shape — select the boundary on the map for editing
- Delete boundary — remove the project-linked boundary
Project-linked boundaries are included with the project context. When parcel workflows are tied to that project, including search, save, and analysis flows, Pillar carries the boundary forward with the project instead of treating it as a standalone collection markup.
Select (Lasso)#
Draw a freehand lasso around multiple markup items to select them. Selected items can be:
- Bulk deleted — remove all selected items at once
- Moved to a collection — assign all selected items to a different collection
The lasso works across all markup types simultaneously — pins, comments, notes, drawings, and measurements.
Collections#
Collections let you organize your markup into groups. Use them to separate markup by project, team, or purpose.
- Click the collection picker in the toolbar to switch between collections
- Create a new collection with a name and color
- New markup is automatically added to the active collection
- Toggle visibility per collection — hide collections you don't need right now
- Rename or delete collections from the dropdown menu
- Deleting a collection does not delete its items — they become ungrouped
All collections and markup are shared with your entire organization. Team members see each other's annotations in real time.