Working with the map
Navigation, basemaps, project tables, view state, and the tools on the left rail.
Updated · June 2026
The map is the heart of Pillar. Every filter, selection, and export you make eventually starts here, so it pays to know the tools.
Anatomy of the map view#
- Basemap — the background imagery. You can switch between streets, light/dark, satellite, and Google hybrid. The basemap switcher is in the lower-right corner of the map.
- Left rail — workspace switcher (Map, Lists, CRM, Dashboard) and context-sensitive tabs for each.
- Filter bar — top of the map; every active filter appears here as a chip. Click a chip to edit it, or the × to remove it.
- Canvas — the map itself. Pan, zoom, click, draw, and select here.
- Detail drawer — appears on the right when you click a parcel; shows all the attributes Pillar has for it.
Projects on the map#
Use Show on Map from Projects to send the current project set to the map. Pillar switches to the Map view, turns on My Projects if needed, fits the map to those project geometries, and opens a bottom Projects tab.
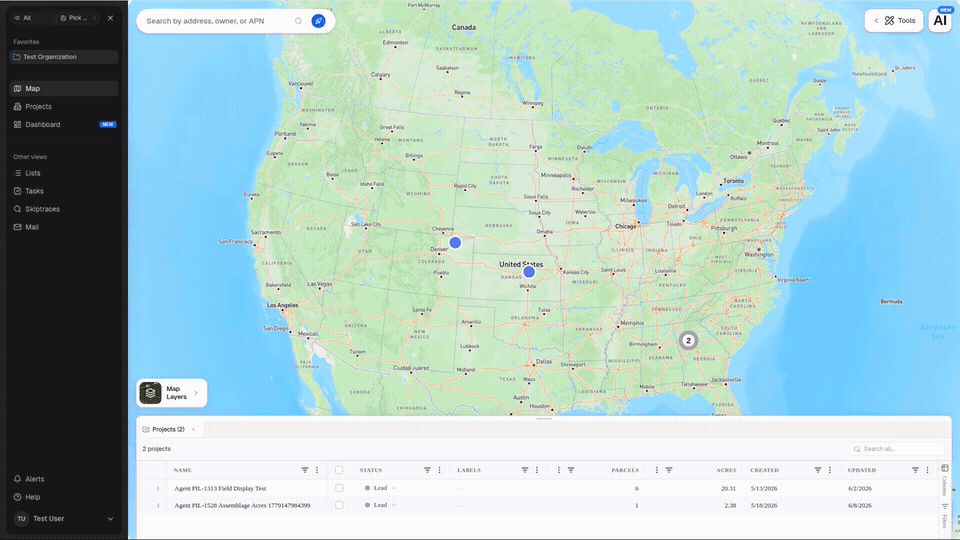
The bottom tab is an AG Grid table. It starts with the core project columns: Name, Status, Labels, Parcels, Acres, Created, and Updated. Open the grid's Columns sidebar to add more fields, including creator, budget, purchase price, type, source search, parcel-derived owner/city/state/zoning/address fields, target close, contract start, description, notes, and custom fields.
From the project table you can:
- Search across the visible projects with Search all....
- Sort, resize, filter, pin, auto-size, or reset columns from the column menus.
- Select rows with the checkboxes, then use Move Status or Delete for bulk updates.
- Click a project row to fly the map to that project. Pillar centers on the project geometry, zooms in, highlights it, and opens parcel details when a parcel can be resolved at that point.
Navigation#
- Pan — click and drag.
- Zoom — scroll wheel or use the
+/−buttons in the corner. - Jump to location — use the geography filter to type an address, city, county, or ZIP code.
- Draw a polygon — click the pencil icon in the filter bar; then click to lay down vertices, and double-click (or close back to the start) to finish. Anything outside your polygon is excluded from the search.
Basemaps#
| Basemap | When to use it |
|---|---|
| Streets (light) | Daily driver — maximum legibility of roads and labels. |
| Streets (dark) | Same, easier on the eyes in low light. |
| Satellite | Verifying what's actually on a parcel (structures, pavement, vegetation). |
| Google Hybrid | Satellite imagery with road labels overlaid. |
| Sentinel-2 | Up-to-date (~5 day) cloud-free satellite for seeing recent changes. |
The basemap preference is remembered per-device.
Layers vs. filters#
These two words sound similar and people often conflate them. They're not the same thing.
- Filters shrink the set of parcels that match your query. Changing a filter changes which parcels are highlighted and which show in your result count. Filters affect saved lists.
- Layers add context on top of the map without changing the parcel result set. A layer is something you look at; a filter is something you search with.
Some data (zoning, for example) exists as both a layer and a filter — you can turn on the zoning overlay to see districts, and separately filter for parcels that sit in a specific zoning category.
Selecting parcels#
- Single — click a parcel. The detail drawer opens.
- Multiple — hold
Shiftand click. Each click toggles that parcel in the current selection. - Bulk — use the Select all visible button (top of the filter bar) to pick every parcel matching your current filter.
To save a selection, click Save → Save selection or Save as list (see Bulk save).
Keyboard shortcuts#
Most map actions have a shortcut — see Keyboard shortcuts for the full list. The two you'll use most:
G— focus the geography filter (type and hit Enter to jump)./— focus universal search.